HTML+CSS宝典 CSS进阶[扩展] svg
svg 英文全程是 scalable vector graphics,意思是可缩放的矢量图
scalable 可缩放的
vector 矢量的
graphics 图像
svg 的特点
1. 该图片使用代码书写而成
2. 缩放不会失真(因为普通图片是一个一个的像素点组成的,svg是从这个坐标到另外一个坐标连成一条线,中心点半径画一个圆)
3. 内容轻量(因为是代码书写而成,不涉及到像素点,所以svg要小的多)
为什么图片不用svg呢?
因为svg通常只能做简单的图形,比如画一个圆,做一个进度条…
一、使用 svg
svg可以嵌入浏览器,也可以单独成为一个文件,两者都可以。
比如从 http://iconfont.cn 网上下载一张svg图像到本地,下载后可以双击在浏览器打开
1. 用 vscode 打开 svg 文件
2. Alt + Shift + F 格式化代码
3. 打开 svg 文件后是代码(一般jpg、png图片是二进制)
<?xml version="1.0" standalone="no"?>
<!DOCTYPE svg PUBLIC "-//W3C//DTD SVG 1.1//EN" "http://www.w3.org/Graphics/SVG/1.1/DTD/svg11.dtd">
<svg t="1646269982476" class="icon" viewBox="0 0 1024 1024" version="1.1" xmlns="http://www.w3.org/2000/svg" p-id="5372" xmlns:xlink="http://www.w3.org/1999/xlink" width="48" height="48">
  <defs>
    <style type="text/css"></style>
  </defs>
  <path d="M352.814545 385.396364m-33.512727 0a33.512727 33.512727 0 1 0 67.025455 0 33.512727 33.512727 0 1 0-67.025455 0Z" fill="#50B674" p-id="5373"></path>
  <path d="M502.690909 384.465455m-33.512727 0a33.512727 33.512727 0 1 0 67.025454 0 33.512727 33.512727 0 1 0-67.025454 0Z" fill="#50B674" p-id="5374"></path>
  <path d="M576.232727 534.341818m-23.272727 0a23.272727 23.272727 0 1 0 46.545455 0 23.272727 23.272727 0 1 0-46.545455 0Z" fill="#50B674" p-id="5375"></path>
  <path d="M694.458182 536.203636m-23.272727 0a23.272727 23.272727 0 1 0 46.545454 0 23.272727 23.272727 0 1 0-46.545454 0Z" fill="#50B674" p-id="5376"></path>
  <path d="M512 0C229.003636 0 0 229.003636 0 512s229.003636 512 512 512 512-229.003636 512-512S794.996364 0 512 0z m-87.505455 630.225455c-26.996364 0-48.407273-5.585455-75.403636-11.17091l-75.403636 37.236364 21.410909-64.232727c-53.992727-37.236364-85.643636-85.643636-85.643637-145.221818 0-102.4 96.814545-182.458182 215.04-182.458182 105.192727 0 198.283636 64.232727 216.901819 150.807273-6.516364-0.930909-13.963636-0.930909-20.48-0.93091-102.4 0-182.458182 76.334545-182.458182 170.356364 0 15.825455 2.792727 30.72 6.516363 44.683636-7.447273 0-13.963636 0.930909-20.48 0.93091z m314.647273 75.403636l15.825455 53.992727-58.647273-32.581818c-21.410909 5.585455-42.821818 11.170909-64.232727 11.170909-102.4 0-182.458182-69.818182-182.458182-155.461818s80.058182-155.461818 182.458182-155.461818c96.814545 0 182.458182 69.818182 182.458182 155.461818 0 47.476364-31.650909 90.298182-75.403637 122.88z" fill="#50B674" p-id="5377"></path>
</svg>
按照标准的写法,前面两行代码要加上,
前面两行不加也可以浏览器可以纠错,实际上加上更好
1、如何把 svg 代码嵌入到网页里面
只保留 svg 标签内的部分,把这段代码直接粘贴到页面,可以在 style 行内样式里面设置尺寸大小
<!DOCTYPE html>
<html>
<head>
<meta charset="utf-8">
<title>svg</title>
<style>
  svg{ /* 可以设置样式,放大也非非常清晰 */
    width: 300px;
    height: 300px;
  }
</style>
</head>
<body>

<svg t="1646269982476" class="icon" viewBox="0 0 1024 1024" version="1.1" xmlns="http://www.w3.org/2000/svg" p-id="5372" xmlns:xlink="http://www.w3.org/1999/xlink" width="48" height="48">
  <defs>
    <style type="text/css"></style>
  </defs>
  <path d="M352.814545 385.396364m-33.512727 0a33.512727 33.512727 0 1 0 67.025455 0 33.512727 33.512727 0 1 0-67.025455 0Z" fill="#50B674" p-id="5373"></path>
  <path d="M502.690909 384.465455m-33.512727 0a33.512727 33.512727 0 1 0 67.025454 0 33.512727 33.512727 0 1 0-67.025454 0Z" fill="#50B674" p-id="5374"></path>
  <path d="M576.232727 534.341818m-23.272727 0a23.272727 23.272727 0 1 0 46.545455 0 23.272727 23.272727 0 1 0-46.545455 0Z" fill="#50B674" p-id="5375"></path>
  <path d="M694.458182 536.203636m-23.272727 0a23.272727 23.272727 0 1 0 46.545454 0 23.272727 23.272727 0 1 0-46.545454 0Z" fill="#50B674" p-id="5376"></path>
  <path d="M512 0C229.003636 0 0 229.003636 0 512s229.003636 512 512 512 512-229.003636 512-512S794.996364 0 512 0z m-87.505455 630.225455c-26.996364 0-48.407273-5.585455-75.403636-11.17091l-75.403636 37.236364 21.410909-64.232727c-53.992727-37.236364-85.643636-85.643636-85.643637-145.221818 0-102.4 96.814545-182.458182 215.04-182.458182 105.192727 0 198.283636 64.232727 216.901819 150.807273-6.516364-0.930909-13.963636-0.930909-20.48-0.93091-102.4 0-182.458182 76.334545-182.458182 170.356364 0 15.825455 2.792727 30.72 6.516363 44.683636-7.447273 0-13.963636 0.930909-20.48 0.93091z m314.647273 75.403636l15.825455 53.992727-58.647273-32.581818c-21.410909 5.585455-42.821818 11.170909-64.232727 11.170909-102.4 0-182.458182-69.818182-182.458182-155.461818s80.058182-155.461818 182.458182-155.461818c96.814545 0 182.458182 69.818182 182.458182 155.461818 0 47.476364-31.650909 90.298182-75.403637 122.88z" fill="#50B674" p-id="5377"></path>
</svg>

</body>
</html>
2、使用外部的 svg 文件(有几个方法)
用 img 元素
<!DOCTYPE html>
<html>
<head>
<meta charset="utf-8">
<title></title>
<style>
  img{
    width: 100px;
    height: 100px;
  }
</style>
</head>
<body>

  <img src="weixin.svg" alt="">

</body>
</html>
用背景图
<!DOCTYPE html>
<html>
<head>
<meta charset="utf-8">
<title></title>
<style>
  p{
    width: 100px;
    height: 100px;
    background: url('./weixin.svg') no-repeat center/100% 100%; /* background: url('./weixin.svg') no-repeat center/cover */
  }
</style>
</head>
<body>

  <p></p>

</body>
</html>
还是可以使用 embad(embed意思是嵌入元素),object 使用方法也一样
<!DOCTYPE html>
<html>
<head>
<meta charset="utf-8">
<title></title>
<style>
  embed,object{
    width: 100px;
    height: 100px;
  }
</style>
</head>
<body>

  <embed src="./weixin.svg" type="image/svg+xml"></embed>
  <object data="./weixin.svg" type="image/svg+xml"></object>

</body>
</html>
还有 iframe 也可以
<!DOCTYPE html>
<html>
<head>
<meta charset="utf-8">
<title></title>
</head>
<body>

  <iframe src="./weixin.svg" frameborder="0" width="100" height="100"></iframe>

</body>
</html>
可以手动改 svg 的尺寸
width="300"
height="300"
<svg t="1646269982476" class="icon" viewBox="0 0 1024 1024" version="1.1" xmlns="http://www.w3.org/2000/svg" p-id="5372" xmlns:xlink="http://www.w3.org/1999/xlink" width="300" height="300">
  <defs>
    <style type="text/css"></style>
  </defs>
  <path d="M352.814545 385.396364m-33.512727 0a33.512727 33.512727 0 1 0 67.025455 0 33.512727 33.512727 0 1 0-67.025455 0Z" fill="#50B674" p-id="5373"></path>
  <path d="M502.690909 384.465455m-33.512727 0a33.512727 33.512727 0 1 0 67.025454 0 33.512727 33.512727 0 1 0-67.025454 0Z" fill="#50B674" p-id="5374"></path>
  <path d="M576.232727 534.341818m-23.272727 0a23.272727 23.272727 0 1 0 46.545455 0 23.272727 23.272727 0 1 0-46.545455 0Z" fill="#50B674" p-id="5375"></path>
  <path d="M694.458182 536.203636m-23.272727 0a23.272727 23.272727 0 1 0 46.545454 0 23.272727 23.272727 0 1 0-46.545454 0Z" fill="#50B674" p-id="5376"></path>
  <path d="M512 0C229.003636 0 0 229.003636 0 512s229.003636 512 512 512 512-229.003636 512-512S794.996364 0 512 0z m-87.505455 630.225455c-26.996364 0-48.407273-5.585455-75.403636-11.17091l-75.403636 37.236364 21.410909-64.232727c-53.992727-37.236364-85.643636-85.643636-85.643637-145.221818 0-102.4 96.814545-182.458182 215.04-182.458182 105.192727 0 198.283636 64.232727 216.901819 150.807273-6.516364-0.930909-13.963636-0.930909-20.48-0.93091-102.4 0-182.458182 76.334545-182.458182 170.356364 0 15.825455 2.792727 30.72 6.516363 44.683636-7.447273 0-13.963636 0.930909-20.48 0.93091z m314.647273 75.403636l15.825455 53.992727-58.647273-32.581818c-21.410909 5.585455-42.821818 11.170909-64.232727 11.170909-102.4 0-182.458182-69.818182-182.458182-155.461818s80.058182-155.461818 182.458182-155.461818c96.814545 0 182.458182 69.818182 182.458182 155.461818 0 47.476364-31.650909 90.298182-75.403637 122.88z" fill="#50B674" p-id="5377"></path>
</svg>
二、如何书写 svg
建议安装一个 vscode 插件,插件名字就叫 svg,提供书写时候的智能支持
创建一个 test.svg 文件,元素标签 svg 表示是一张图片
1. svg 是根节点
2. xmlng 是命名空间
3. 宽高可以自定义,可以不写( 默认宽高300 x 150 )
<svg xmlns="http://www.w3.org/2000/svg" width="300" height="150" style="background:yellow">

</svg>
svg 标签里面有哪些形状?
矩形 rect
圆形 circle
椭圆 ellipse
线条 line
折线 polyline
多边形 polygon
1、矩形 rect
矩形的单词是 rect,全称是 rectangle,简写是 rect
fill 设置颜色的
stroke 边框颜色
stroke-width 表示边框的宽度
坐标系的原点是以整个图片的左上角开始计算
x 横坐标位置(向右)
y 纵左边位置(向下)
<svg xmlns="http://www.w3.org/2000/svg"  width="300" height="300" style="background:lightyellow">
  <rect width="100" height="100" fill="red" stroke="#008c8c" stroke-width="10" x="100" y="50"/>
</svg>
效果
2、圆形 circle
设置圆形的中心点
cx 中心点横向位置
cy 中心点纵向位置
r 表示圆的半径
fill 填充
设置边框
stroke 边框颜色
stroke-width 表示边框的宽度
<svg xmlns="http://www.w3.org/2000/svg"  width="300" height="300" style="background:lightyellow">

	<circle cx="100" cy="90" r="50" fill="#ff8c8c" stroke="yellow" stroke-width="10"/>

</svg>
效果
如果只要描边不要背景,设置 fill 的值为 transparent fill="transparent"
<svg xmlns="http://www.w3.org/2000/svg"  width="300" height="300" style="background:lightyellow">

    <circle cx="100" cy="90" r="50" fill="transparent" stroke="yellow" stroke-width="10"/>

</svg>
效果
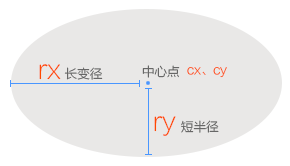
3、椭圆 ellipse
圆形中心点坐标
cx 横向位置
cy 纵向位置
rx 长变径
ry 短半径

<svg xmlns="http://www.w3.org/2000/svg"  width="300" height="300" style="background:lightyellow">

    <ellipse rx="100" ry="50" cx="120" cy="100" fill="red"/>

</svg>
效果
4、线条 line
<svg xmlns="http://www.w3.org/2000/svg"  width="300" height="300" style="background:lightyellow">

    <line x1="10" y1="10" x2="200" y2="200" stroke="red" stroke-width="3"/>

</svg>
效果
折线可以写多个线条line,就可以完成折线了,
也可以设置折线polyline
5、折线 polyline
polyline 多线段,多边形的意思
points属性设置多个坐标,把这些坐标连起来
第一个点 60,50( 起始点坐标 )
第二个点 60,90
第三个点 100,90
第四个点 100,150
第五个点 150,150
第六个点 150,200
<svg xmlns="http://www.w3.org/2000/svg"  width="300" height="300" style="background:lightyellow">

    <polyline points="60,50,  60,90, 100,90,  100,150,  150,150, 150,200"/>

</svg>
为什么变成这个样子呢?
因为默认设置了填充色,会把第一个起点和最后一个点相连,然后把这个封闭区域进行填充
先把填充去掉 fill="transparent" 或者设置 fill="none",这两个都是禁止填充
然后设置描边 stroke="red" stroke-width="1"
<svg xmlns="http://www.w3.org/2000/svg"  width="300" height="300" style="background:lightyellow">

    <polyline points="60,50,  60,90, 100,90,  100,150,  150,150, 150,200"  fill="none" stroke="red" stroke-width="1"/>

</svg>
6、多边形 polygon
points属性也是要给一些列坐标,多边形线会连接回来形成一个闭合
<svg xmlns="http://www.w3.org/2000/svg"  width="300" height="300" style="background:lightyellow">

    <polygon points="60,50,  115,50, 150,160,  40,160"  fill="yellow" stroke="red" stroke-width="1"/>

</svg>
可以设置填充,也可以不填充
如果不设置填充,可以设置描边,也可以不描边
PS:上面这些形状可以通过js、java生成,给一些规则通过代码生成形状
实际上,上面的所有形状,都可以通过path路径画出来
三、路径 path
d="<path>" 属性d里面写路径,<path>标签来定义路径。
下面的命令可用于路径数据
M = moveto 表示定位
L = lineto 表示画线
H = horizontal lineto
V = vertical lineto
C = curveto
S = smooth curveto
Q = quadratic Belzier curve
T = smooth quadratic Belzier curveto
A = elliptical Arc 画弧线
Z = closepath 表示闭合路径
1、画线
M 表示moveto定位(按照习惯M大写),d="M150 30" 表示坐标移动到某一个地方( 下面移动的位置150,30 )
L 表示lineto画一条线,d="M150 30 L250 30",画到250 30这个位置,设置描边
<svg xmlns="http://www.w3.org/2000/svg"  width="300" height="300" style="background:lightyellow">

	<path d="M150 30 L250 30" stroke="red" stroke-width="1"/>

</svg>
不用line,用path也轻松的做出线的效果
描边属性也可以写到styles里面
<svg xmlns="http://www.w3.org/2000/svg"  width="300" height="300" style="background:lightyellow">

	<path d="M150 30 L250 30" style="stroke:red; stroke-width:1;"/>

</svg>
再接着连线
1). 继续连接到 L250 150
2). 默认有填充,不设置填充 fill="none"
<svg xmlns="http://www.w3.org/2000/svg"  width="300" height="300" style="background:lightyellow">

	<path d="M150 30 L250 30 L250 150" fill="none" style="stroke:red; stroke-width:1;"/>

</svg>
继续连线,连到 L150 150
<svg xmlns="http://www.w3.org/2000/svg"  width="300" height="300" style="background:lightyellow">

	<path d="M150 30 L250 30 L250 150 L150 150" fill="none" style="stroke:red; stroke-width:1;"/>

</svg>
最后连回去不需要写坐标,只需要后面加Z(Z = closepath 表示闭合路径),就自动把最后坐标点 闭合到 起点坐标
<svg xmlns="http://www.w3.org/2000/svg"  width="300" height="300" style="background:lightyellow">

	<path d="M150 30 L250 30 L250 150 L150 150 Z" fill="none" style="stroke:red; stroke-width:1;"/>

</svg>
自动闭合
如果需要填充就随便设置填充
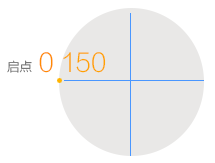
2、画一个半圆
01/
首先定义起点 M0 150

02/
画弧线 A变径1 半径2 (A里面的给的参数比较多)
M0 150 A150 150 画椭圆要设置两个半径,这里要画标准的圆,所以半径是一样的150 150
03/
顺时针旋转的角度
M0 150 A150 150 0 旋转的角度,相对x轴顺时针转,既然是圆形,旋转没有意义所以设置0
04/
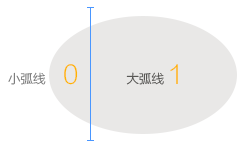
画小弧线0/画大弧线1
M0 150 A150 150 0 0 我们的起点是如图,要往上画一个弧线,所以设置小弧线0

05/
顺时针画弧1/逆时针画弧0(图4)
A150 150 0 0 1 顺时针画写1

06/
知道启始坐标(M0 150),最后一个参数是终点的坐标150 0
A150 150 0 0 1 150 0 终点坐标150 0
<svg xmlns="http://www.w3.org/2000/svg"  width="300" height="300" style="background:lightyellow">

	<path d="M0 150 A150 150 0 0 1 150 0" fill="none" style="stroke:#FF8c8c; stroke-width:1;"/>

</svg>
PS: 如果没有显示,直接打开svg文件,有错误提示
四、路径练习画太极
01/
circle 先画一个直径200像素的圆
<svg xmlns="http://www.w3.org/2000/svg" width="500" height="500" style="background:#eee">

    <circle cx="250" cy="250" r="200" fill="none" stroke="#999" stroke-width="1"/>

</svg>
02/
path在这个圆里画一个直径100像素正弧线
<svg xmlns="http://www.w3.org/2000/svg" width="500" height="500" style="background:#eee">

    <circle cx="250" cy="250" r="200" fill="none" stroke="#999" stroke-width="1"/>
    <path d="M250 50 A100 100 0 0 1 250 250" fill="none" stroke="#999" stroke-width="3"/>

</svg>
03/
接着上面的正弧线画一个直接100像素的反弧线
<svg xmlns="http://www.w3.org/2000/svg" width="500" height="500" style="background:#eee">

    <circle cx="250" cy="250" r="200" fill="none" stroke="#999" stroke-width="1"/>
    <path d="M250 50 A100 100 0 0 1 250 250 A100 100 0 0 0 250 450" fill="none" stroke="#999" stroke-width="3"/>

</svg>
04/
接着画200像素的正弧线
<svg xmlns="http://www.w3.org/2000/svg" width="500" height="500" style="background:#eee">

	<circle cx="250" cy="250" r="200" fill="none" stroke="#999" stroke-width="1"/>
	<path d="M250 50 A100 100 0 0 1 250 250 A100 100 0 0 0 250 450 A200 200 0 0 1 250 50" fill="none" stroke="#999" stroke-width="3"/>

</svg>
05/
去掉线,用黑白两色填充
<svg xmlns="http://www.w3.org/2000/svg" width="500" height="500" style="background:#eee">

	<circle cx="250" cy="250" r="200" fill="#fff"/>
	<path d="M250 50 A100 100 0 0 1 250 250 A100 100 0 0 0 250 450 A200 200 0 0 1 250 50" fill="#000"/>

</svg>
06/
最后完成
<svg xmlns="http://www.w3.org/2000/svg" width="500" height="500" style="background:#eee">

    <circle cx="250" cy="250" r="200" fill="#fff"/>
    <path d="M250 50 A100 100 0 0 1 250 250 A100 100 0 0 0 250 450 A200 200 0 0 1 250 50" fill="#000"/>

    <circle cx="250" cy="150" r="43" fill="#fff"/>
    <circle cx="250" cy="350" r="43" fill="#000"/>

</svg>
